Thursday, 30 September 2010

SimplexSimplicity - minimalist template

I want to introduce my latest template . SimplexSimplicity . It's built base on Tabs,which is very popular in modern websites .


Live demo | Download

This template is very simple . It's similar to Simplex Vcard but instead of contact information ,this template can show blog post . I've kept neccesary elements ,so this look very clean . If you need a template for diary or mini blog ,you can think about this template .
To install this template ,you can see instruction bellow :
1,Download this template

2,Open template in anyword editor you have .

3,To change the text in header ,you can find this :
<h1><a expr:href='data:blog.homepageUrl'>SimplexSimplicity</a></h1>

and change it to what you want .You can also replace this line with image ,logo .

4,To change tab names ,you can find this code :
<ul class="tabs">
        <li class="active"><a href="#tab1">Recent Posts</a></li>
        <li><a href="#tab2">Recent Comments</a></li>
        <li><a href="#tab3">Category</a></li>
        <li><a href="#tab4">Contact</a></li>
     </ul>

Change the text in bold to the what you want .

5,To add category,find this code :
<h2>Category</h2>
               <ul>
                 <li><a href="">Category</a></li>
                 <li><a href="">Category</a></li>
                 <li><a href="">Category</a></li>
                 <li><a href="">Category</a></li>
                 <li><a href="">Category</a></li>
             </ul>
add the link to category you want and change the anchor text . For example you want to add link to category name : blogger ,change <li><a href="">Category</a></li> to <li><a href="http://your blog url/search/label/blogger">Blogger</a></li>

6,To change the contact page ,find this code :
<h2>Contact</h2>           
            <h3><a href="http://simplexdesign.blogspot.com">SimplexDesign.blogspot.com</a></h3>
            <p>This template is created by SimplexDesign . It's a minimalist-style template .</p>                  
            <p>If you like this template and wanna install it on your site ,pls go to SimplexDesign.blogspot.com to know how </p>

and change it to your contact information .

7,Save template and upload it to Blogger .

I hope you like this template . Pls wait for my next templates and feel free to comments ^^

Tuesday, 28 September 2010

Simplex Column - grid based template from Simplex Design

In previous posts ,I told you about template SimplexColumn ,which I'm using for SimplexDesign blog . It's a clean and simple template ,I think it can be used for a blog or portfolio . Live demo you can see SimplexDesign blog ^^ .


Download

 To install this template ,you can follow instruction bellow :

1,Download this template .

2,Open it in any word editor you have .

3,To change logo ,find this  code :
<img src='http://img684.imageshack.us/img684/4229/logopa.jpg'/>        
and change the link in bold to your logo url .

4, To change subscribe email ,find this code :
<form action='http://feedburner.google.com/fb/a/mailverify' method='post' onsubmit='window.open(&apos;http://feedburner.google.com/fb/a/mailverify?uri=Simplex&apos;, &apos;popupwindow&apos;, &apos;scrollbars=yes,width=550,height=520&apos;);return true' target='popupwindow'>
                             <input name='uri' type='hidden' value='Simplex'/>
                             <input name='loc' type='hidden' value='en_US'/>
                             <p class='email-form'>
                                 <input class='sub' name='email' type='text' value='email address'/>
                                 <input alt='submit' class='btn' type='submit' value='Submit'/>
                             </p>
                             <div style='clear: both;'>
                                 <small>Privacy guaranteed. We&#39;ll never share your info.</small>
                             </div>
                         </form>
and change the text 'Simplex' in bold to your Feedburner account .

5,To change social network accounts ,find this code :
<li class='feed'>
                             <a href='http://simplexdesign.blogspot.com/feeds/posts/default ' title='Subscribe via RSS Feed'>
                                 <span class='title'>RSS Feed</span><br/>
                                 http://simplexdesign.blogspot.com/feeds/posts/default               
                             </a>
                         </li>
                         <li class='twitter'>
                             <a href='http://www.twitter.com/dinhquanghuy' rel='external' target='_blank' title='Follow Me'>
                                 <span class='title'>Follow Me</span><br/>
                                 twitter.com/dinhquanghuy                   
                             </a>
                         </li>
and change the text in bold to your social network account .

6,To add ads bellow post ,find this code :
<div class='ad250'>
                                 <!--YOUR ADS HERE -->
                             </div>
and replace 'YOUR ADS HERE' with the code of your ad .This ad will appear bellow your post ,next to Related posts section .

7,Save template and upload it to Blogger .

8,Go to Blogger Dashboard ,continue to Design and then to Page Element .

9,Click on edit link in menu widget to add link to your categories in this dialog :

Link to your category has structure like this : http://yourblog .blogspot.com/search/label/your category 

10,There are many place ready for adding widget ,you can add any you want .

Save changes ,and you are done .

This template is using CSS3 , so in IE8 and older version ,you can't see borders and shadow ,Javascript work well with IE8 ,and other browsers .

I hope this template helpful to you .Feel free to leave me comments ^^

Friday, 24 September 2010

Simplex News Aggregator - RSS reader template

One man who mailed to me request a template that can get RSS news from other sites . He has a lot of blogs ,so he want to make a portal that can aggregate latest posts from these blogs. Like a blog network ^^ Here is my result


Live Demo 

Download


This template is built base on GAjaxfetcher script from Dynamicdrive.com . I modified and imroved it for making this template .

This template can get RSS from other sites and display it in time order .
How to install this template :
1,Download this template .

2,Open it in any word editor you have

3,In template file ,you will see these div elements :

<div class="box">
                 <h1>Category 1</h1>
                 <script type="text/javascript">
                     var newsfeed=new gfeedfetcher("list1")
                     newsfeed.addFeed("NYT", "http://www.nytimes.com/services/xml/rss/nyt/International.xml")
                     newsfeed.addFeed("Yahoo News", "http://rss.news.yahoo.com/rss/world")
                     newsfeed.filterfeed(5) //Show 5 entries, sort by date
                     newsfeed.init() //Always call this last
                 </script>
             </div>

             <div class="box">
                 <h1>Category 2</h1>
                 <script type="text/javascript">
                     var newsfeed=new gfeedfetcher("list2")
                     newsfeed.addFeed("BBC", "http://feeds.bbci.co.uk/news/technology/rss.xml")
                     newsfeed.addFeed("CNN", "http://rss.cnn.com/rss/cnn_tech.rss")
                     newsfeed.addFeed("Pcworld", "http://feeds.pcworld.com/pcworld/techlog")
                     newsfeed.addFeed("todaypc", "http://feeds.pcworld.com/pcworld/blogs/todayatpcw")
                     newsfeed.filterfeed(5) //Show 5 entries, sort by date
                     newsfeed.init() //Always call this last
                 </script>
             </div>

             <div class="box">
                 <h1>Category 3</h1>
                 <script type="text/javascript">
                     var newsfeed=new gfeedfetcher("list3")
                     newsfeed.addFeed("BBC", "http://news.bbc.co.uk/rss/newsonline_world_edition/uk_news/politics/rss091.xml")
                     newsfeed.addFeed("CNN", "http://rss.cnn.com/rss/cnn_allpolitics.rss")
                     newsfeed.addFeed("YN", "http://rss.news.yahoo.com/rss/mideast")
                     newsfeed.filterfeed(5) //Show 5 entries, sort by date
                     newsfeed.init() //Always call this last
                 </script>
             </div>
            

Here is the code of first category
<div class="box">
                 <h1>Category 1</h1>
                 <script type="text/javascript">
                     var newsfeed=new gfeedfetcher("list1")
                     newsfeed.addFeed("NYT", "http://www.nytimes.com/services/xml/rss/nyt/International.xml")
                     newsfeed.addFeed("Yahoo News", "http://rss.news.yahoo.com/rss/world")
                     newsfeed.filterfeed(5) //Show 5 entries, sort by date
                     newsfeed.init() //Always call this last
                 </script>
             </div>


Let's take a closer look inside the code

- In this code <h1>Category 1</h1> is the title of category.

- This line var newsfeed=new gfeedfetcher("list1") define the element wrapping arround the RSS news , "list1" is the id of element . Id of element must be unique .
- This line newsfeed.addFeed("NYT", "http://www.nytimes.com/services/xml/rss/nyt/International.xml") will add a RSS feed at address http://www.nytimes.com/services/xml/rss/nyt/International.xml to the list of RSS source for Category 1 ,and NYT is the label of this feed source

-This line  newsfeed.addFeed("Yahoo News", "http://rss.news.yahoo.com/rss/world") is similar to the line above
-This line  newsfeed.filterfeed(5) //Show 5 entries, sort by date indicate the number of news item  will be displayed .
-This line  newsfeed.init() //Always call this last will start the function getting feeds from RSS sources above .

Other categories has the same structure .

Now ,everything is very clear .

To change the category name : you can change the text Category .. in <h1>Category ...</h1> to your category name ,for example ,Politics ,Business ...

To add feed sources ,just use this structure newsfeed.addFeed(" feed-label ", " feed address ")

Wanna show more items in each category ? change value "5" in this line newsfeed.filterfeed(5) //Show 5 entries, sort by date
to the value you want .

To add more category ,just copy this code :

<div class="box">
                 <h1>Category 1</h1>
                 <script type="text/javascript">
                     var newsfeed=new gfeedfetcher("list1")
                     newsfeed.addFeed("NYT", "http://www.nytimes.com/services/xml/rss/nyt/International.xml")
                     newsfeed.addFeed("Yahoo News", "http://rss.news.yahoo.com/rss/world")
                     newsfeed.filterfeed(5) //Show 5 entries, sort by date
                     newsfeed.init() //Always call this last
                 </script>
             </div>
 
and paste it in template .

change the category title ,add your feed ,change the number of item ,and remember to change the "list1" in this line var newsfeed=new gfeedfetcher("list1") to an unique value .

4,To change the logo

find this <img src="http://img684.imageshack.us/img684/4229/logopa.jpg"/> and change http://img684.imageshack.us/img684/4229/logopa.jpg to your logo link .

Save template ,and upload it to Blogger .

Go to Blogger Dashboard ,click on Design - > Page Elements ,you can add or remove any widget you want in the footer .

That's all for this template . I hope this template helpful to your work .Feel free to leave me comments ^^ Thanks .

Tuesday, 21 September 2010

Important annoucement - update Javascript files for templates

Yesterday ,my Google code account is banned by Google for violating their TOS . And they deleted all Javascript files of mine ,so many templates can not working . I'm so sorry for this error .

There are 9 templates affected : Simplex Portfolio ,Simplex Auto ,Simplex Blognews ,Simplex Celebrity ,Simplex Enews ,Simplex Newsadvance ,Simplex Portal ,Simplex Timeline ,and Simplex Tube .
Other templates are still good .


If you are using one of 9 templates above ,the solution is very simple ,you need to find javascript files used in your template and move it to another hosting .

I uploaded all javascript files to 110mb.com ,and you can use them if don't want to spend time for finding a host and upload javascript files .
Open your template ,go to Dashboard -> Design -> Edit HTML ,checked Expand widget templates
Find and replace the code for each template as following :

1,Simplex Portfolio :
Find and Replace
<script src="http://simplexportfolio.googlecode.com/files/mootools-1.2.1-core-yc.js" type="text/javascript"></script>
        <script src="http://simplexportfolio.googlecode.com/files/mootools-1.2-more.js" type="text/javascript"></script>
        <script src="http://simplexportfolio.googlecode.com/files/jd.gallery.js" type="text/javascript"></script>
        <script src="http://simplexportfolio.googlecode.com/files/jd.gallery.transitions.js" type="text/javascript"></script>       
With
<script src="http://dinhquanghuy.110mb.com/template/mootools-1.2.1-core-yc.js" type="text/javascript"></script>
        <script src="http://dinhquanghuy.110mb.com/template/mootools-1.2-more.js" type="text/javascript"></script>
        <script src="http://dinhquanghuy.110mb.com/template/jd.gallery.js" type="text/javascript"></script>
        <script src="http://dinhquanghuy.110mb.com/template/jd.gallery.transitions.js" type="text/javascript"></script>


2,Simplex Auto

Find and Replace

<script src="http://simplexportfolio.googlecode.com/files/easySlider1.5.js" type="text/javascript"></script>

<script src="http://simplexportfolio.googlecode.com/files/ajaxtabs.js" type="text/javascript" language="javascript"></script>

with

<script src="http://dinhquanghuy.110mb.com/template/easySlider1.5.js" type="text/javascript"></script>

<script src="http://dinhquanghuy.110mb.com/template/ajaxtabs.js" type="text/javascript" language="javascript"></script>

3,Simplex BlogNews

Find and Replace

<script src="http://simplexportfolio.googlecode.com/files/jCarouselLite.js" type="text/javascript"></script>
 <script src="http://simplexportfolio.googlecode.com/files/contentslider.js" type="text/javascript"></script>

with
<script src="http://dinhquanghuy.110mb.com/template/jCarouselLite.js" type="text/javascript"></script>
 <script src="http://dinhquanghuy.110mb.com/template/contentslider.js" type="text/javascript"></script>

4,Simplex Celebrity

Find and Replace

<script src="http://simplexportfolio.googlecode.com/files/jquery.min.js" type="text/javascript"></script>
<script src="http://simplexportfolio.googlecode.com/files/jquery-ui.min.js" type="text/javascript"></script>
with
<script src='http://ajax.googleapis.com/ajax/libs/jquery/1.4.2/jquery.min.js' type='text/javascript'/>
<script src="http://dinhquanghuy.110mb.com/template/jquery-ui.min.js" type="text/javascript"></script>

5,Simplex Enews

Find and Replace

<script src="http://simplexportfolio.googlecode.com/files/jquery.innerfade.js" type="text/javascript"></script>
<script src="http://simplexportfolio.googlecode.com/files/jquery.cycle.js" type="text/javascript"></script>
with
<script src="http://dinhquanghuy.110mb.com/template/jquery.innerfade.js" type="text/javascript"></script>
<script src="http://dinhquanghuy.110mb.com/template/jquery.cycle.min.js" type="text/javascript"></script>

6,Simplex Newspaper II

Find and Replace

<script src="http://simplexportfolio.googlecode.com/files/jCarouselLite.js" type="text/javascript"></script>
  <script src="http://simplexportfolio.googlecode.com/files/jqueryslidemenu.js" type="text/javascript"></script>
 <script src="http://simplexportfolio.googlecode.com/files/contentslider.js" type="text/javascript"></script>
With
<script src="http://dinhquanghuy.110mb.com/template/jCarouselLite.js" type="text/javascript"></script>
  <script src="http://dinhquanghuy.110mb.com/template/jqueryslidemenu.js" type="text/javascript"></script>
 <script src="http://dinhquanghuy.110mb.com/template/contentslider.js"></script>

7,Simplex Newsportal

Find and Replace

<script src="http://simplexportfolio.googlecode.com/files/jquery.min.js" type="text/javascript"></script>
<script src="http://simplexportfolio.googlecode.com/files/jquery-ui.min.js" type="text/javascript"></script>
<script src="http://simplexportfolio.googlecode.com/files/ajaxtabs.js" type="text/javascript" language="javascript"></script>
with

<script src='http://ajax.googleapis.com/ajax/libs/jquery/1.4.2/jquery.min.js' type='text/javascript'/>
<script src="http://dinhquanghuy.110mb.com/template/jquery-ui.min.js" type="text/javascript"></script>
<script src="http://dinhquanghuy.110mb.com/template/ajaxtabs.js" type="text/javascript" language="javascript"></script>

8,Simplex Timeline

Find and Replace

<script src="http://simplexportfolio.googlecode.com/files/jquery.cycle.js" type="text/javascript"></script>
With
<script src="http://dinhquanghuy.110mb.com/template/jquery.cycle.min.js" type="text/javascript"></script>

9,Simplex Tube

Find and Replace

<script type="text/javascript" src="http://simplexportfolio.googlecode.com/files/curvycorners.js"></script> 
<script src="http://simplexportfolio.googlecode.com/files/jquery.bxSlider.js" type="text/javascript"></script>
with
<script type="text/javascript" src="http://dinhquanghuy.110mb.com/template/curvycorners.js"></script>      
<script src="http://dinhquanghuy.110mb.com/template/jquery.bxslider2.0.1.min.js" type="text/javascript"></script>  

110mb host space and bandwidth are limited ,so if you find out a better hosting service ,you can download javascript package ,it contain javascript files need for 9 templates, choose what files you need (you can see the text in black bold above for file name) , upload them to your host and replace the link in the code above ( I marked them in black bold) to your javascript file link .


I hope with this post,you can fixed error and keep blogging up ^^

Thursday, 16 September 2010

Adding social bookmark buttons to Simplex templates

Some of you asked me for adding Social bookmark button in post in blog . All templates I made are modified ,very different from default template ,so if you are using a automatic service ,scan template and adding social bookmark button in template , you will get no result .
I have a small tip for you all . We can use Addthis service .
You can go to this page and see the list of bookmark button styles you want to add to your blog .
For example ,I will use Tweet+like+share button .


click on this style ,you will see there are 3 block of code include : The CSS ,the HTML and Javascript .
Open your template in any word editor you have , insert the CSS code before ]]></b:skin>
if there is no CSS code block , you can ignore this step .

Find this code <p><data:post.body/></p> and insert the HTML code and Javascript which Addthis provided above it ,like this :
 <div class="addthis_toolbox addthis_pill_combo">
        <a class="addthis_button_tweet" tw:count="vertical"></a>
        <a class="addthis_button_facebook_like"></a>
        <a class="addthis_button_compact">Share</a>
    </div>

<script type="text/javascript" src="http://s7.addthis.com/js/250/addthis_widget.js#username=YOUR-ACCOUNT-ID"></script>

<p><data:post.body/></p>                            
Save template and upload to Blogger ,you will see Tweet+like+Share button appear at the begining of posts.
If you want it appear at the end of posts ,just insert the HTML and Javascript code right after  <p><data:post.body/></p>
There are many styles of Social bookmark buttons in Addthis gallery for you to choose .
Remember ,if you want to insert at the beginning of each post ,just add the code before <p><data:post.body/></p> ,and add the code after <p><data:post.body/></p> if you want to insert the buttons at the end of each post .
That's all .After adding it ,Addthis will do it work

Wednesday, 15 September 2010

Adding Google Search to your blog


I myself find out that Blogger Search engine is not good . Its result is not accuracy . I search for a term but it give me some posts that is not related to what I search . I don't know why . Many peoples tell me something like that .So I switch to Google search . When your blog is crawled by Google Search engine ,it can search for whole blog with a high accuracy .
To adding Google search to blog ,many people know how ,but in this post ,I still want to write it down . Hope it useful to newbie ^^

1, First ,login to your blog ,and create a Page  ,leave content blank and name it "search result"  ,you will have a page with url like that http://your blog.blogspot.com/p/search-result.html

2, If you are using a Pages widget to show pages exist in your site ,go to Design - > page element -> click on edit button on Pages widget , in Configure Page List widget dialog,uncheck the option : Automatically add new pages when they are published  and uncheck the search result page in Pages to Show


click Save . If you are not using a Page widget ,you can ignore this step .
This step will make Blogspot not show search result page in page navigation of your blog .

3, The next step ,you need a Google account .This step is very easy because you're using Blogger ^^ .
Go to this page http://www.google.com/cse/manage/create and login .

4, There's a page to define all information for search engine . You can set your own options ,but I think you should set the option for search only your blog ,and in Sites to Search ,enter your blog address adding a * ,like this :
http://simplexdesign.blogspot.com/* . Google will understand the * for searching whole blog . You can limit the area for search using separately URL .

5,When you finish register new search engine , go to Dash board of your search .

In the Indexing , you have to submit your site map for Google indexing your site . With Blogger ,you can enter the Feed URL of your blog instead of a sitemap . You can enter url of the page you want to index separately .

In the Look and feel section , checked Iframe in Choose the hosting option . This option will help you create a custom search on your blog ,and show the result in a page of your site .In following tabs ,you can set the layout ,link color... of your custom search and result . After that ,click on Get code .

In Get code tab , enter the page where you want the search result show up into Specify the url in your site where you want the search result to appears text box .
In this case , enter the url http://your blog.blogspot.com/p/search-result.html
There are two blocks of code . One is Search box code and the other is Search result code .
Copy and paste Search box code and Search result code into two text files .

6,Go to Blogger ,to Dashboard ,continue to Design ,and then to Page element . Create a HTML/Javascript widget .
Paste the code of Search box code in to this widget .

7,Go to Posting tab,click on Edit Pages . There's a list of pages in your blog .Click on Edit in search result page . An editting window will appear . Click on Edit HTML tab and paste the code of search result into page content .
That's all .Save your page . From now ,you can search in your blog using Google Search engine . The result will be showed in search result page .


If you want to customize the search box ,you can add a little of CSS for make it look as you want .For example : I got a code for search box like this

<form action="http://your blog.blogspot.com/p/search-result.html" id="cse-search-box">
                 <div>
                     <input type="hidden" name="cx" value="008412172873235352933:vknsgzepq88" />
                     <input type="hidden" name="cof" value="FORID:10" />
                     <input type="hidden" name="ie" value="UTF-8" />
                     <input type="text" name="q" size="31" />
                     <input type="submit" name="sa" value="Search" />
                 </div>
             </form>
             <script type="text/javascript" src="http://www.google.com/cse/brand?form=cse-search-box&lang=en=en"></script>           


I can add class for search form elements like this :
<input type="text" class="ibox" name="q" size="31" />
                     <input type="submit" name="sa" class="btn" value="Search" />

and then ,using CSS to styling it ,like this :
<style>
#cse-search-box{
background:none repeat scroll 0 0 #1C191A;
display:inline;
float:right;
height:2.8em;
overflow:hidden;
padding-right:10px;
}

#cse-search-box input.ibox {
background:none repeat scroll 0 0 #848484;
border:1px solid #4C4C4C;
display:inline;
font-size:0.85em;
height:16px;
margin-top:5px;
padding:1px 0 0 1px;
width:140px;
}
#cse-search-box input.btn {
line-height:1.75em;
display:inline;
float:left;
font-size:0.92em;
margin:7px 40px 0 12px;
border:none;
cursor:pointer;
color:#f5f5f5;
}
</style>

the CSS code above is just an example ,you can add another CSS tags to make it look as you want .This CSS can be place in HTML/javascript widget which already contain search box code ,or you can place it in template file ,before </head>

In the search result page ,if the search result is larger than your page and break your page layout ,you can also add CSS script to make it smaller . Just go to Edit Pages in posting tab . click on edit of Search result page ,and paste CSS code in page content . like this :

<style>
#cse-search-results iframe {
width:600px;
}
</style>
<div id="cse-search-results">
</div>
<script type="text/javascript">
  var googleSearchIframeName = "cse-search-results";
  var googleSearchFormName = "cse-search-box";
  var googleSearchFrameWidth = 400;
  var googleSearchDomain = "www.google.com";
  var googleSearchPath = "/cse";
</script>
<script src="http://www.google.com/afsonline/show_afs_search.js" type="text/javascript">
</script>
you can add more CSS code to make it as you want .Of course ^^ .

This is my post for adding Google Search box to Blogger and show the result in a page of Blogger . I think it make search result look like a part of your site , not a stand alone page . In some case ,if the search can not find anything , it's just because Google is not index your page . You have to submit your page sitemap as I mentioned above and wait .
That's all . Thanks for reading .

Tuesday, 14 September 2010

Simplex Design blog got a new design


My blog used template Simplex Pro for a year .It's a good template ,clean and simple . And now ,after one year ,I think SimplexDesign need a new template .A new template will give us more space to articles, improve the search and sharing tool,and make blog design be unique . So I decide to change it to Simplex Column ,a new template of mine . With a clean interface ,based on grid layout ,I hope you will get better experiences when reading article in my site .


I also redesign logo .I'm not a professional designer ,and I tried my best to create this .  I think it better than the older .

By the way ,I re-openned SimplexDesign facebook fanpage . I want to make it a place for discussion and suggestion ,a forum where people can help each other ,and together ,we find answer for our questions . If you want to be one of SimplexDesign community ,why don't you ' Like ' and become a member of this page ?

That's all change I made recently . I hope you like this ^^ and keep support SimplexDesign .

Friday, 10 September 2010

Comment avatar for people who don't have one ?

Some peoples ask me how to add an image for people who don't enable their avatar in comments . Yes, I missed this function when making template . In my templates, you see nothing in avatar frame if people who comment don't enable their avatar . Why don't we add an image in avatar frame for them instead of using blank ?  Like this


or like this (^^make it look like Gravatar)


the trick here is very simple .
Just find this code :
<b:if cond='data:blog.enabledCommentProfileImages'>
<data:comment.authorAvatarImage/>
</b:if>


and replace it with

<b:if cond='data:blog.enabledCommentProfileImages'>
<data:comment.authorAvatarImage/>
<b:else/>
<img src="http://img844.imageshack.us/img844/3447/unknownuser.jpg"/>
</b:if>

with this code ,if people don't enable their profile images (or their Blogger avatar in comment ) it will show image <img src="http://img844.imageshack.us/img844/3447/unknownuser.jpg"/>
you can replace image which I marked in bold to your own

Friday, 3 September 2010

Create a simple accordion menu

I have a post on how to create an accordion for Blogger ,but it’s a little bit difficult to follow steps and understand how it work .
So in this post ,I will show you another way to create Accordion menu ,and I will try so hard to explain how it work . I hope you will find it helpful and you can create your own menus base on this.


 Live Demo


First ,this is the HTML structure of menu :
<div id="first" class="menu_list"> <!--Code for menu starts here-->
        <p class="menu_head">Header-1</p>
        <div class="menu_body">
        <a href="#">Link-1</a>
         <a href="#">Link-2</a>
         <a href="#">Link-3</a>   
        </div>
        <p class="menu_head">Header-2</p>
        <div class="menu_body">
            <a href="#">Link-1</a>
         <a href="#">Link-2</a>
         <a href="#">Link-3</a>   
        </div>
        <p class="menu_head">Header-3</p>
        <div class="menu_body">
          <a href="#">Link-1</a>
         <a href="#">Link-2</a>
         <a href="#">Link-3</a>           
       </div>
  </div>  <!--Code for menu ends here-->

The first div with id=”first” is the element that wrap menu .

<p>  element with class “menu head” mean headers of menu ,or large items ,when we click mouse on these large item ,small items will drop down .

<div> with class “menu_body” is the element that wrap small items in the menu .

<a> elements are small items in menu .

That’s structure of menu .

Now we need to decorate it with a little of CSS
<style type="text/css">
body {
    margin: 10px auto;
    font: 75%/120% Verdana,Arial, Helvetica, sans-serif;
}
.menu_list {   
    width: 150px;
}
.menu_head {
    padding: 5px 10px;
    cursor: pointer;
    position: relative;
    margin:1px;
    font-weight:bold;
    background: #eef4d3 url(รข�¦..left.png) center right no-repeat;
}
.menu_body {
    display:none;
}
.menu_body a{
  display:block;
  color:#006699;
  background-color:#EFEFEF;
  padding-left:10px;
  font-weight:bold;
  text-decoration:none;
}
.menu_body a:hover{
  color: #000000;
  text-decoration:underline;
  }
</style>

In the CSS code above :

Body tag will define the font and style for all .

.menu_list define the size for element with class=”menu_list” is 150px width .

.menu_head set style for element with class”menu_head” (large items) in the menu

.menu_body a  and menu_body a:hover set the style for <a> tags which are covered by element with classs”menu_body”

.menu_body { display:none }
will hide element with id “menu_body” (the element wrap small items) . We hide it first and will show it when mouse click or mouse over the lare item of menu .

Now ,to make it work ,we need some Jquery code :

<script type="text/javascript" language="javascript" src="jquery.js"></script>
<script type="text/javascript">
$(document).ready(function()
{
    //slides the element with class "menu_body" when paragraph with class "menu_head" is clicked
    $("#first p.menu_head").click(function()
    {
        $(this).css({backgroundImage:"url(down.png)"}).next("div.menu_body").slideDown(500).siblings("div.menu_body").slideUp("slow");
           $(this).siblings().css({backgroundImage:"url(left.png)"});
    });
   
});
</script>

The <script type="text/javascript" language="javascript" src="jquery.js"></script> will implement jquery framework into file . After that,we can use Jquery functions .
In the following script :
$(document).ready(function() :  define a funtion that only work when page loaded fully .

$("#first p.menu_head").click(function() ;
define a funtion that only work when a
element with class “menu_head” which is covered by element with id “first” is clicked .
(or we can say ,this line define a function that only work when a large item in menu is clicked )

The following line :
$(this).css({backgroundImage:"url(down.png)"}).next("div.menu_body").slideDown(500).siblings("div.menu_body").slideUp("slow");
           $(this).siblings().css({backgroundImage:"url(left.png)"});

$(this) here mean large item in menu which is clicked (p element with class “menu_head” and covered by element with id”first” ,as we mention above)

. css({backgroundImage:"url(down.png)"}) :  set the background image of large item to “down.png” (or add the down arrow the large item of menu )

.next("div.menu_body") : this line will find the closest div element with class”menu_body” to large item in the menu ( or we can say find the closest element wrap small item in menu ) ,and select it .

.slideDown(500) will drop down small item in menu . This action will happen in 500 milli seconds

.siblings("div.menu_body") : find all other <div> element with class “menu_body” and select them .

.slideUp("slow") : slide up all other <div> element with class “menu_body” which are found in .siblings("div.menu_body") . The speed for sliding up is slow .

$(this).siblings().css({backgroundImage:"url(left.png)"}) : this line will find all other large item in menu (p element with class “menu_head” as we say above ) and set background for them “left.png” (arrow to left ) .

If you want to slide up and down the menu when mouse over instead of click ,just replace
    $("#first p.menu_head").click(function()
With
  $("#first p.menu_head").mouseover(function()

To add this menu to Blogger ,first of all , we need to add the CSS first ,after that ,add HTML structure and the last is Jquery .

That’s all for accordion menu ,I think it’s very simple when we know how it work . Thank to that ,we can make my owns .

Wednesday, 1 September 2010

Adding Blog Archive and Stay connected menu to Simplex Blognews template

Latest version of Simplex Blognews - Click here
In latest version of Simplex Blognews ,Blog Archive and Stay connected are integrated as parts of template file . But the tip in this post can be applied with other templates if you want to add Blog Archive or Stay Connected .
A friend from Greece Konstantinos asked me for adding Stay Connected menu (like in Simplex Newsadvance II ) and Blog Archive to top navigation .
So in this post ,I want to show you how to add Stay connected and Blog Archive menu to top navigation bar . You can see the result in live demo of Simplex BlogNews


To add these features to Simplex Blognews template , please open template file in any word editor you have .

1, find this code

#navpages ul{
    float:left;
}
and change it to
#navpages ul{
    float:left;
    width:70%;
}
2, find  </head> and add this line above :

<script src="http://dinhquanghuy.110mb.com/template/jqueryslidemenu.js" type="text/javascript"></script>
 this script will help us make dropdown menu .

3,Adding Blog Archive and Stay Connected menu :

In the template file ,you will see this code :
<div id="navpages">
             <ul>
                 <b:section id='page' showaddelement='yes'>
                     <b:widget id='PageList1' locked='false' title='Pages' type='PageList'>
                          <b:includable id='main'>
                             <b:loop values='data:links' var='link'>
                                 <li><a expr:href='data:link.href'><data:link.title/></a></li>
                             </b:loop>
                         </b:includable>
                     </b:widget>                      
                 </b:section>                
             </ul>

Replace the code above with this one :

<div id="navpages">
             <ul>
                 <b:section id='page' showaddelement='yes'>
                     <b:widget id='PageList1' locked='false' title='Pages' type='PageList'>
                          <b:includable id='main'>
                             <b:loop values='data:links' var='link'>
                                 <li><a expr:href='data:link.href'><data:link.title/></a></li>
                             </b:loop>
                         </b:includable>
                     </b:widget>
                    
                     <b:widget id='BlogArchive1' locked='false' title='Blog Archive' type='BlogArchive'>
                         <b:includable id='main'>
                             <b:if cond='data:title'>
                                 <li><a href=""><data:title/></a>
                                     <b:include data='data' name='flat'/>
                                 </li>    
                             </b:if>
                         </b:includable>
                        
                         <b:includable id='flat' var='data'>
                             <ul class='flat'>
                                 <b:loop values='data:data' var='i'>
                                     <li class='archivedate'>
                                         <a expr:href='data:i.url'><data:i.name/></a>
                                     </li>
                                 </b:loop>
                             </ul>
                         </b:includable>
                     </b:widget>
                 </b:section>
                 <li class="">
                     <a href="#" title="">Stay Connected</a>
                     <ul>
                         <li><a href="/feeds/posts/default" class="gab_rss">Latest Posts in RSS</a></li>
                         <li><a title="/feeds/comments/default" rel="nofollow" href="" class="gab_rss">Latest Comments in RSS</a></li>
                         <li><a title="" rel="nofollow" href="Feedburner email" class="gab_email">Subscribe by e-mail</a></li>        
                         <li><a title="" rel="nofollow" href="http://www.twitter.com/dinhquanghuy" class="gab_twitter">Follow us on Twitter</a></li>    
                         <li><a title="" rel="nofollow" href="Facebookaccount" class="gab_facebook">Connect on Facebook</a></li>                
                     </ul>
                 </li>
                
             </ul>

Change the green text in bold to your social network account ,and to your Feedburner Subscribe link .
Save template .
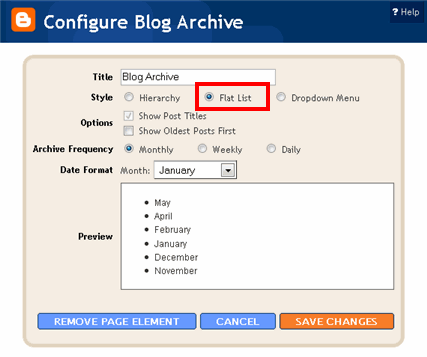
Go to Dashboard ,continue to Design ,then to Page element . Click on edit link in Blog Archive widget . In Configure Blog Archive dialog ,choose Flat List for Style option . In another option ,you can set it as you want .

That's all . I hope you will find this tip helpful .